Leave
Mar 12, 2021 11:34 am
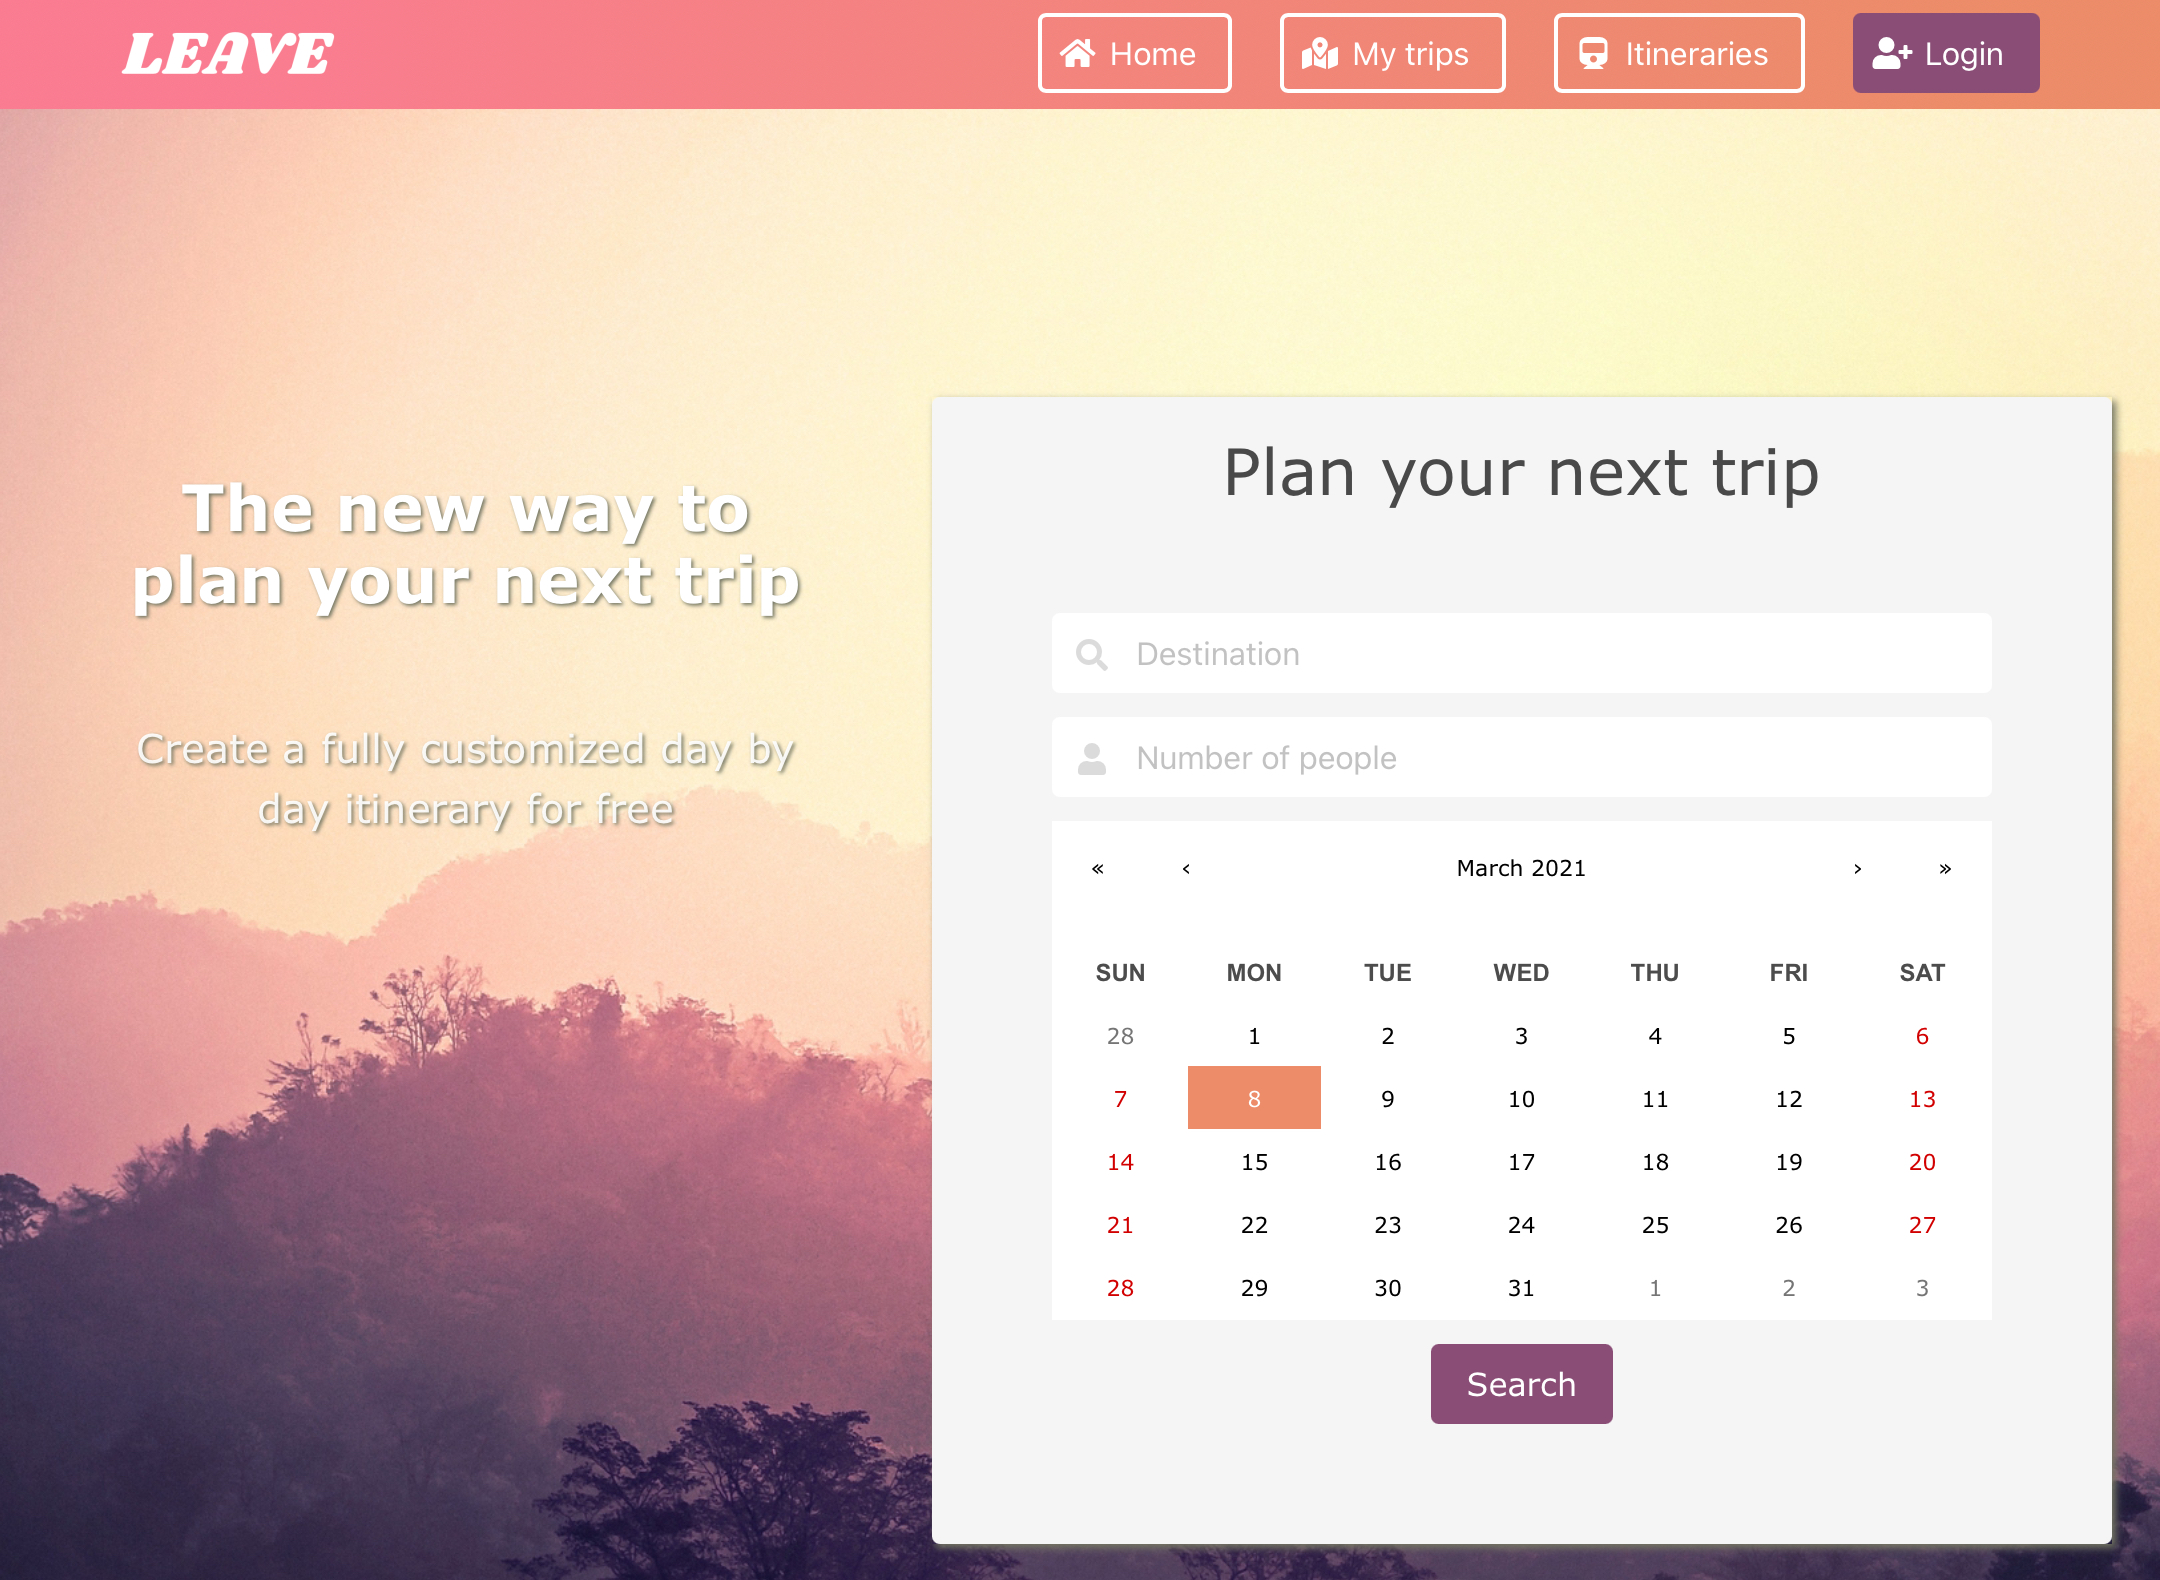
Leave is the final capstone project. I worked together with the same two folks as in previous projects. We created a travel itinerary app using React.js, Node.js, Express.js, and PostgreSQL. We also used Redux to manage state. For styling, we used Sass and Bulma.
The app’s goal is to allow a user to search for a travel destination, input the number of people traveling and the dates. The app makes a fetch request from React to a third-party API and displays a page of results. The user can then save the destination for their trip. On the back end, the trips are stored in a PostgreSQL database.
We divided responsibilities to work on specific features of the app. The first person worked on setting up the database with PostgresSQL along with some of the Express routes. The second person worked on setting up the routes in React to consume third-party endpoints, Redux, and some components. I worked on setting up the Express server, front-end styling, content, Heroku hosting, and external Postgres database, along with a few other odds and ends.
While we did stick with our notes and get a working app up, we didn’t add everything in as we wanted. We would have liked to have included a login system with user authentication, though it was not part of the app’s requirements. Another feature that would have been nice would be to have a separate “favorites” section to store trips that they would like to go.
The biggest struggle overall was timing. We had two weeks to plan, develop, and ship the app. Apart from the timing, I had some difficulty getting the database set up to communicate externally with Heroku’s PostgreSQL plugin. For some reason, I could not get the database created or migrations to run. Perhaps it was just an issue with my understanding, but it became a blocker. I was able to get that resolved by exporting my local database and copied it to my hosting. At that point, I was able to get the app running, and no further issues came about.
This project was the most rewarding that I have worked on to date as I was able to work with all parts of the stack in some capacity, and I have a more thorough understanding of how all of the features work.
This blog post is part of a series of posts giving some background on a few projects that I’ve worked on during my courses at DigitalCrafts.
Books In Space
Mar 11, 2021 10:10 pm
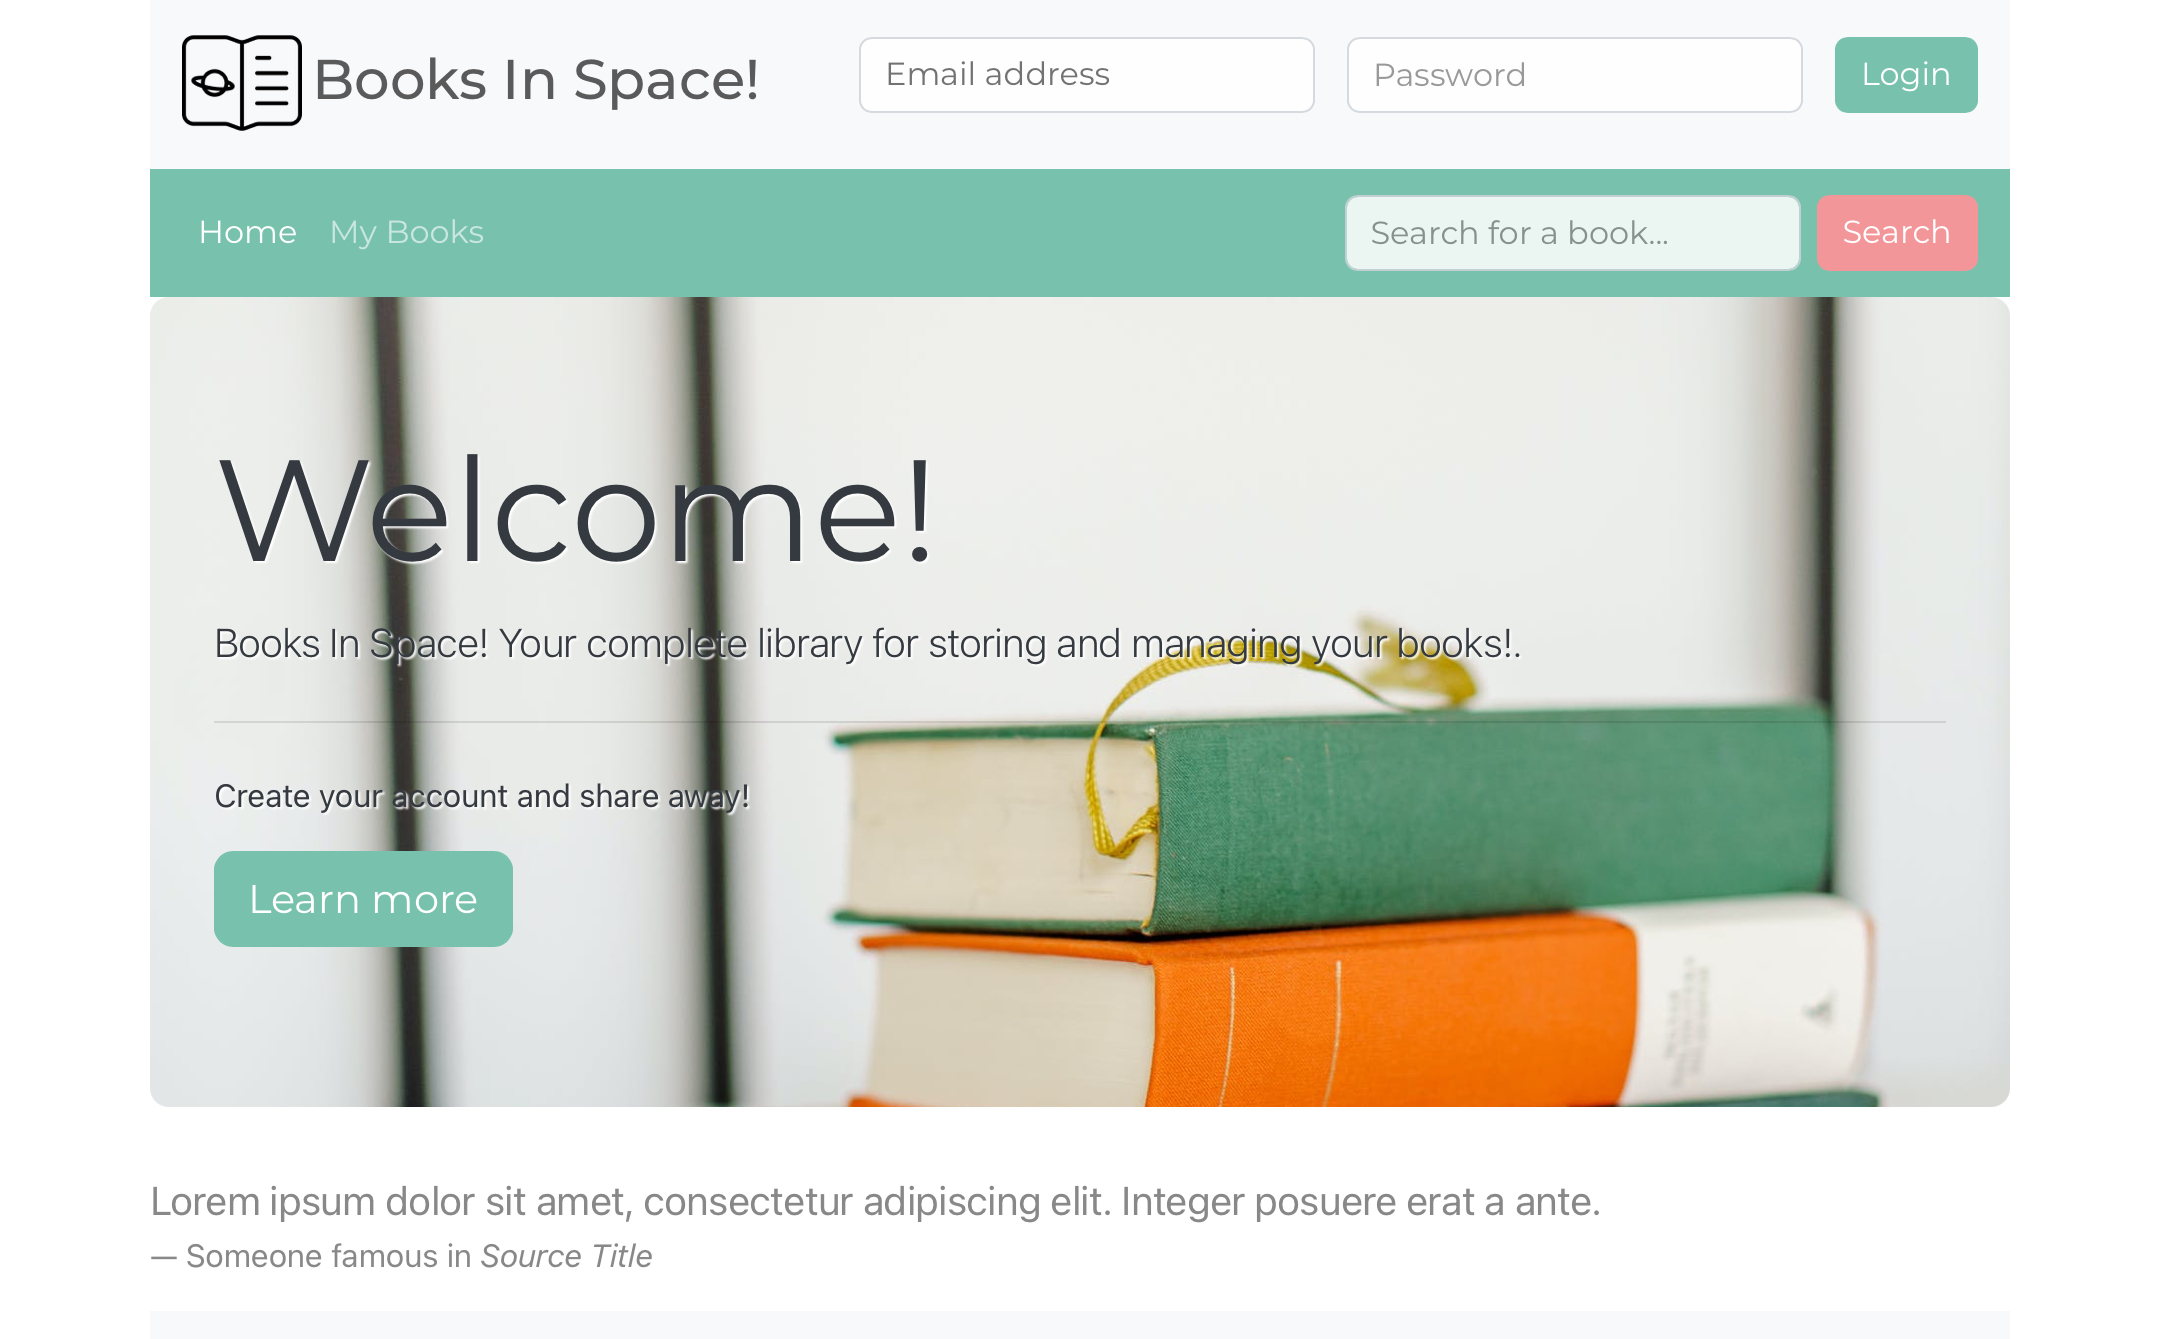
Books in Space was another group effort, consisting of the same two folks I worked with on the Drums in Space project (hence the play on the name). This project aimed to create a book library application for storing and managing books on a virtual shelf.
We used a pretty simple combination of Node.js, Express.js, Bootstrap, and PostgreSQL to build the application. As a team, we divided up responsibilities to develop features more rapidly. I worked on the front end, designing the overall layout, colors, and features, and then eventually helped build the routes and API endpoints we would use to store the books and retrieve them from the PostgreSQL database.
I want to revisit this project in the future. While we have completed all of the requirements for a passing grade on this project, there are still a few important pieces of the unfinished project due to time constraints. The first piece I would like to revisit is the login and authentication system. Some of the routes will also need cleaning up and front-end features that manage storing a book on the “shelf”.
All in all, this was a great learning experience as I felt more comfortable working with Express.js and the stack as a whole. I also learned how to organize and separate concerns between routes and controllers. I look forward to working with these technologies again, even if on a new project.
This blog post is part of a series of posts giving some background on a few projects that I’ve worked on during my courses at DigitalCrafts.
Drums In Space
Feb 25, 2021 3:34 pm
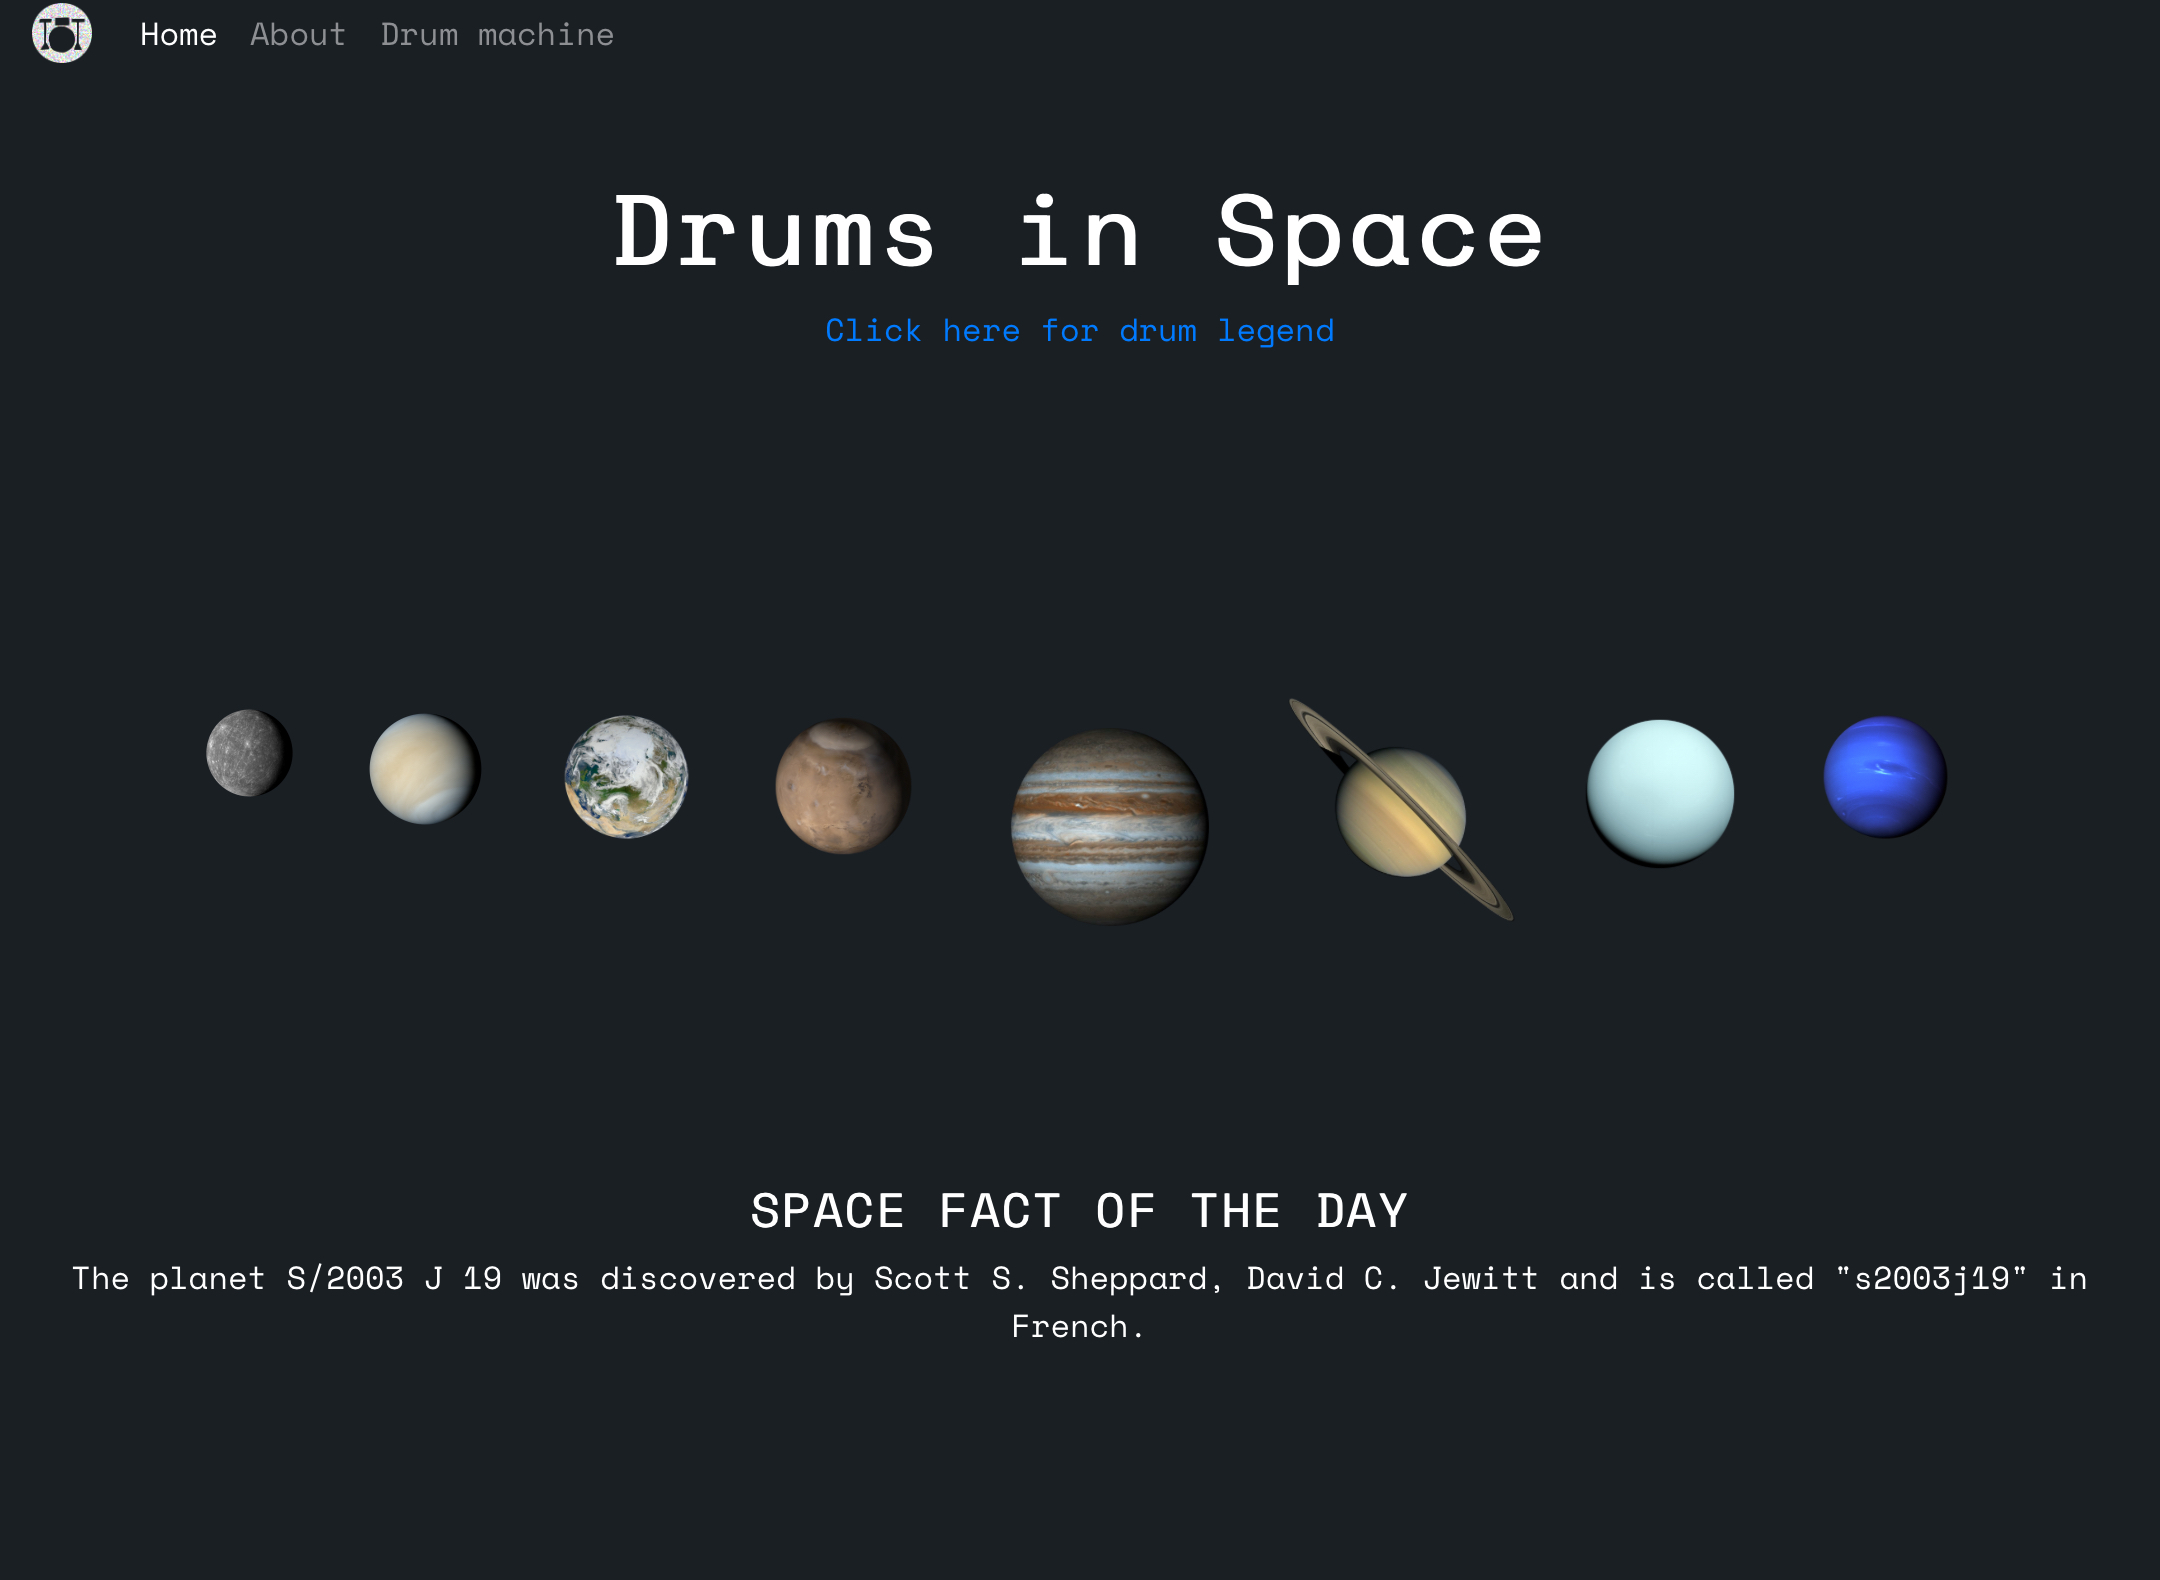
One of our first projects in the course was a group project where we used HTML, CSS, Bootstrap, p5 library, Tone.js, and vanilla JavaScript to create a functional website. My group consisted of two other folks and myself. Since we all enjoyed music, we decided to develop an interactive drum machine with a space theme. What we created is called Drums in space.
We divided up responsibilities creating different parts of the website. One person handled the HTML/CSS and integrated a third-party API to pull in space quotes. Another person worked on some JavaScript to create a sound visualizer and the planets, and I was in charge of putting together the drum machine and sample player.
For the drum sampler on the main page, this was created with some simple JavaScript to listen for the keypresses and mouse clicks to trigger a sound and then used the Web Audio API to play the sounds. Nothing too fancy. I hadn’t discovered Tone.js yet, so I just went with something simple to get the job done.
To create the drum machine, I searched around a bit more to find inspiration. This is when I stumbled on Tone.js and decided to use that library to play the sounds. For the player portion, I used an HTML form for the main structure. Then I used checkbox inputs as the drum pattern to play the sounds. I used some simple JavaScript to loop through the inputs and play the sound using the Tone.js library.
All in all, while it wasn’t a very practical project, it was pretty fun and allowed me to get my feet wet, creating something interactive in the browser and working as a group—two things I had yet to do in learning to code. In the future, I’m going to try and use Tone.js a bit more. I want to create a synthesizer, and this library is perfect.
This blog post is part of a series of posts giving some background on a few projects that I’ve worked on during my courses at DigitalCrafts.
DKIM signing
May 27, 2020 8:28 pm
Recently I went down a rabbit hole that lead me to learn more about SPF, DKIM, DMARC, and BIMI. While many resources cover the benefit of setting up these records, some information is still not quite as readily available. Here’s what I learned on my quest.
One day, I looked through my inbox and noticed that some emails have an avatar displayed next to their sender name. I wondered how one goes about setting an avatar; how hard could that be? After doing a bit of searching around, I stumbled across an article on BIMI, or Brand Indicators for Message Identification. The article suggested that the sending domain must have SPF, DKIM, and DMARC enabled first. I work in technical support for an email delivery company, so I have some familiarity with how SPF/DKIM works. One of the addresses I use outside of work already has a DMARC policy that I setup.
One thing that occurred to me is that I will also need to setup DKIM on my server so that the messages are signed when sending them out. I started to read into implementing DKIM. You will need to set up a public key and a private key stored on your sending server for authentication. There are plenty of resources that walk through creating a public key and even some walk through how to create the private key. Where lies my confusion is where the private key is stored on my server. I looked to my hosting provider for answers. In their knowledge base, there were some notes that DKIM and ARC signing were available. So I thought, “Ok, great. I’ll go ahead and create the DKIM record and then add the private key to the server later. Easy peasy.”
In my DNS panel, I added the DKIM key and saved it. Just as an experiment, I thought I would send an email to see what would happen. I thought maybe my emails will still pass since SPF passes, and DMARC only requires either SPF or DKIM to pass. Nope. I sent a test to a gmail.com address, and the message went straight to junk. “Sorry, we couldn’t verify sending from the domain.” Just for comparison, I have a separate email address with DMARC and an SPF record and no DKIM record. Pretty much the same settings minus DKIM. I sent an email to Gmail, and it passed. My suspicions were confirmed.
So I sent an email to my hosting provider and asked what was up with DKIM signing. DKIM signing hasn’t been rolled out yet as they are running into some issues getting the kinks worked out. Great. At this point, I decided to delete the DKIM record from my DNS panel and continue sending without it. Instead of deleting it, there was some bug in the control panel that duplicated the record. I reached back out to the hosting provider to let them know, and they removed both records without any explanation–not sure if it was them, or the 2048 bit key length I used, or maybe the way the value was copied into the control panel? Who knows.
I learned a lot about the records and how to set them up. I’ll have to revisit this once my hosting provider allows setting up a DKIM record. To be continued.
Library not found
Feb 13, 2020 9:59 pm
It’s been a while since I’ve worked on any projects lately, so I decided that it will get me back into the swing of things if I start writing about a project. I didn’t have the repo cloned or this site, so the first thing I did was pull it down from GitHub.
Next, I tried to fire up Jekyll. I get an error, “library not found for class Digest::SHA2 – digest/sha2 (LoadError)”. Crap. What is that all about? Nothing has changed since my last post; what gives?
I searched around for a little while, but stack overflow was letting me down. Some folks were saying to try this thing or edit that module—many things that didn’t seem relevant to my situation. To see if it may have been specific to my ruby versions, I tried using an older version with rbenv. No luck. I get a host of other errors.
Finally, I did the only sensible thing I can think of. rbenv uninstall ruby 2.5.1. Afterward, I re-installed Jekyll and bundler. I updated my gems. Ran bundle install. It works! I was so relieved.
Now that I have a working Jekyll setup expect more posts to come soon. I will be looking into a few different projects, either with ruby on rails or flask. Stay tuned.
Ghost pages
Sep 10, 2019 12:13 pm
The updates I’m going to be sharing will mostly be for the projects I’m working on. In this case, it will just be the current website and the Nutter Home Designs website. Sometime soon, I’m going to be working on some Ruby on rails apps so I’ll share those as I’m working through them.
When I first set up this website, I was given a few pages to start off with, such as an index.md page, an elements.md page, and a landing.md page. The elements.md page is just a resource to tell you which styles, fonts, and colors are being used on the website. The landing.md page is there as a reference to see how the pages are layed out–I think.
Anyway, I added an about page and saw it displayed on the index page as a tile. I tried to add a new page for projects but didn’t see it show. To try and get the page up, I quickly edited the elements page to say what I wanted it to say and then continued getting the rest of the website setup.
Last night, I decided to circle back and get things sorted out with the elements page. The first thing I tried to do is rename the elements file to projects, but that didn’t work. It displayed an empty tile that linked directly to the site’s main CSS file.
Afterward, I renamed the file back to elements and then dug through all of the _layouts folders and _includes folders in the project. There was no apparent reference to the elements file. I was perplexed.
Eventually, I created a brand new project file. Then copied the contents of the elements file to the projects file. Updated the frontmatter in the projects file and bingo; I could now see the tile appear on the index page. BUT, the old elements tile is also displayed. Getting closer here but was beyond confused.
With this project, the creator added a couple of options in the frontmatter for pages and posts, giving the option to show_tile: true/false and show-nav: true/false. I changed the frontmatter on the elements page to false for both and then set to true on the projects page. I refreshed the index page and noticed some improvement. The elements page was removed from the top navigation but displayed as a blank space on the index page.
Ok, I’m getting closer. I started looking at other files in the _includes folder to see how they were coded. There’s a conditional block at the top of this page that loops through all of the pages and posts and then displays them if they’re anything but false. That’s weird. Here’s an example of what it looked like:
for post in site.posts limit:site.tiles-count
if site.tiles-source == 'posts' and post.show_tile != false
It seems like this should do the trick if the show_tile frontmatter was not set as false, but that’s not the case here for some reason. So I changed the logic to only look at true. Hit refresh on the webpage, and BOOM, it worked. I can now see the correct tiles display on the index page. What a relief. Who knew it was just an issue with the logic.
The next update I want to make is adding some additional images/icons to the website, but I haven’t exactly decided how I want to do that and what images those will be.